Planner Beta
Planner Beta is a powerful central workspace for building and adjusting the operational plan. It is currently in beta and will replace the legacy Planner.
An operator can use it to:
- Schedule trips and place participants where they need to be.
- Assign staff quickly and clearly across the day.
- Manage trip and staff capacity, guide limits, workload, and schedules.
- Monitor insights in Day, Week, and Month views.
- Keep control when plans change.
For a guided walkthrough of the planning workflow, watch the New Planner Masterclass.
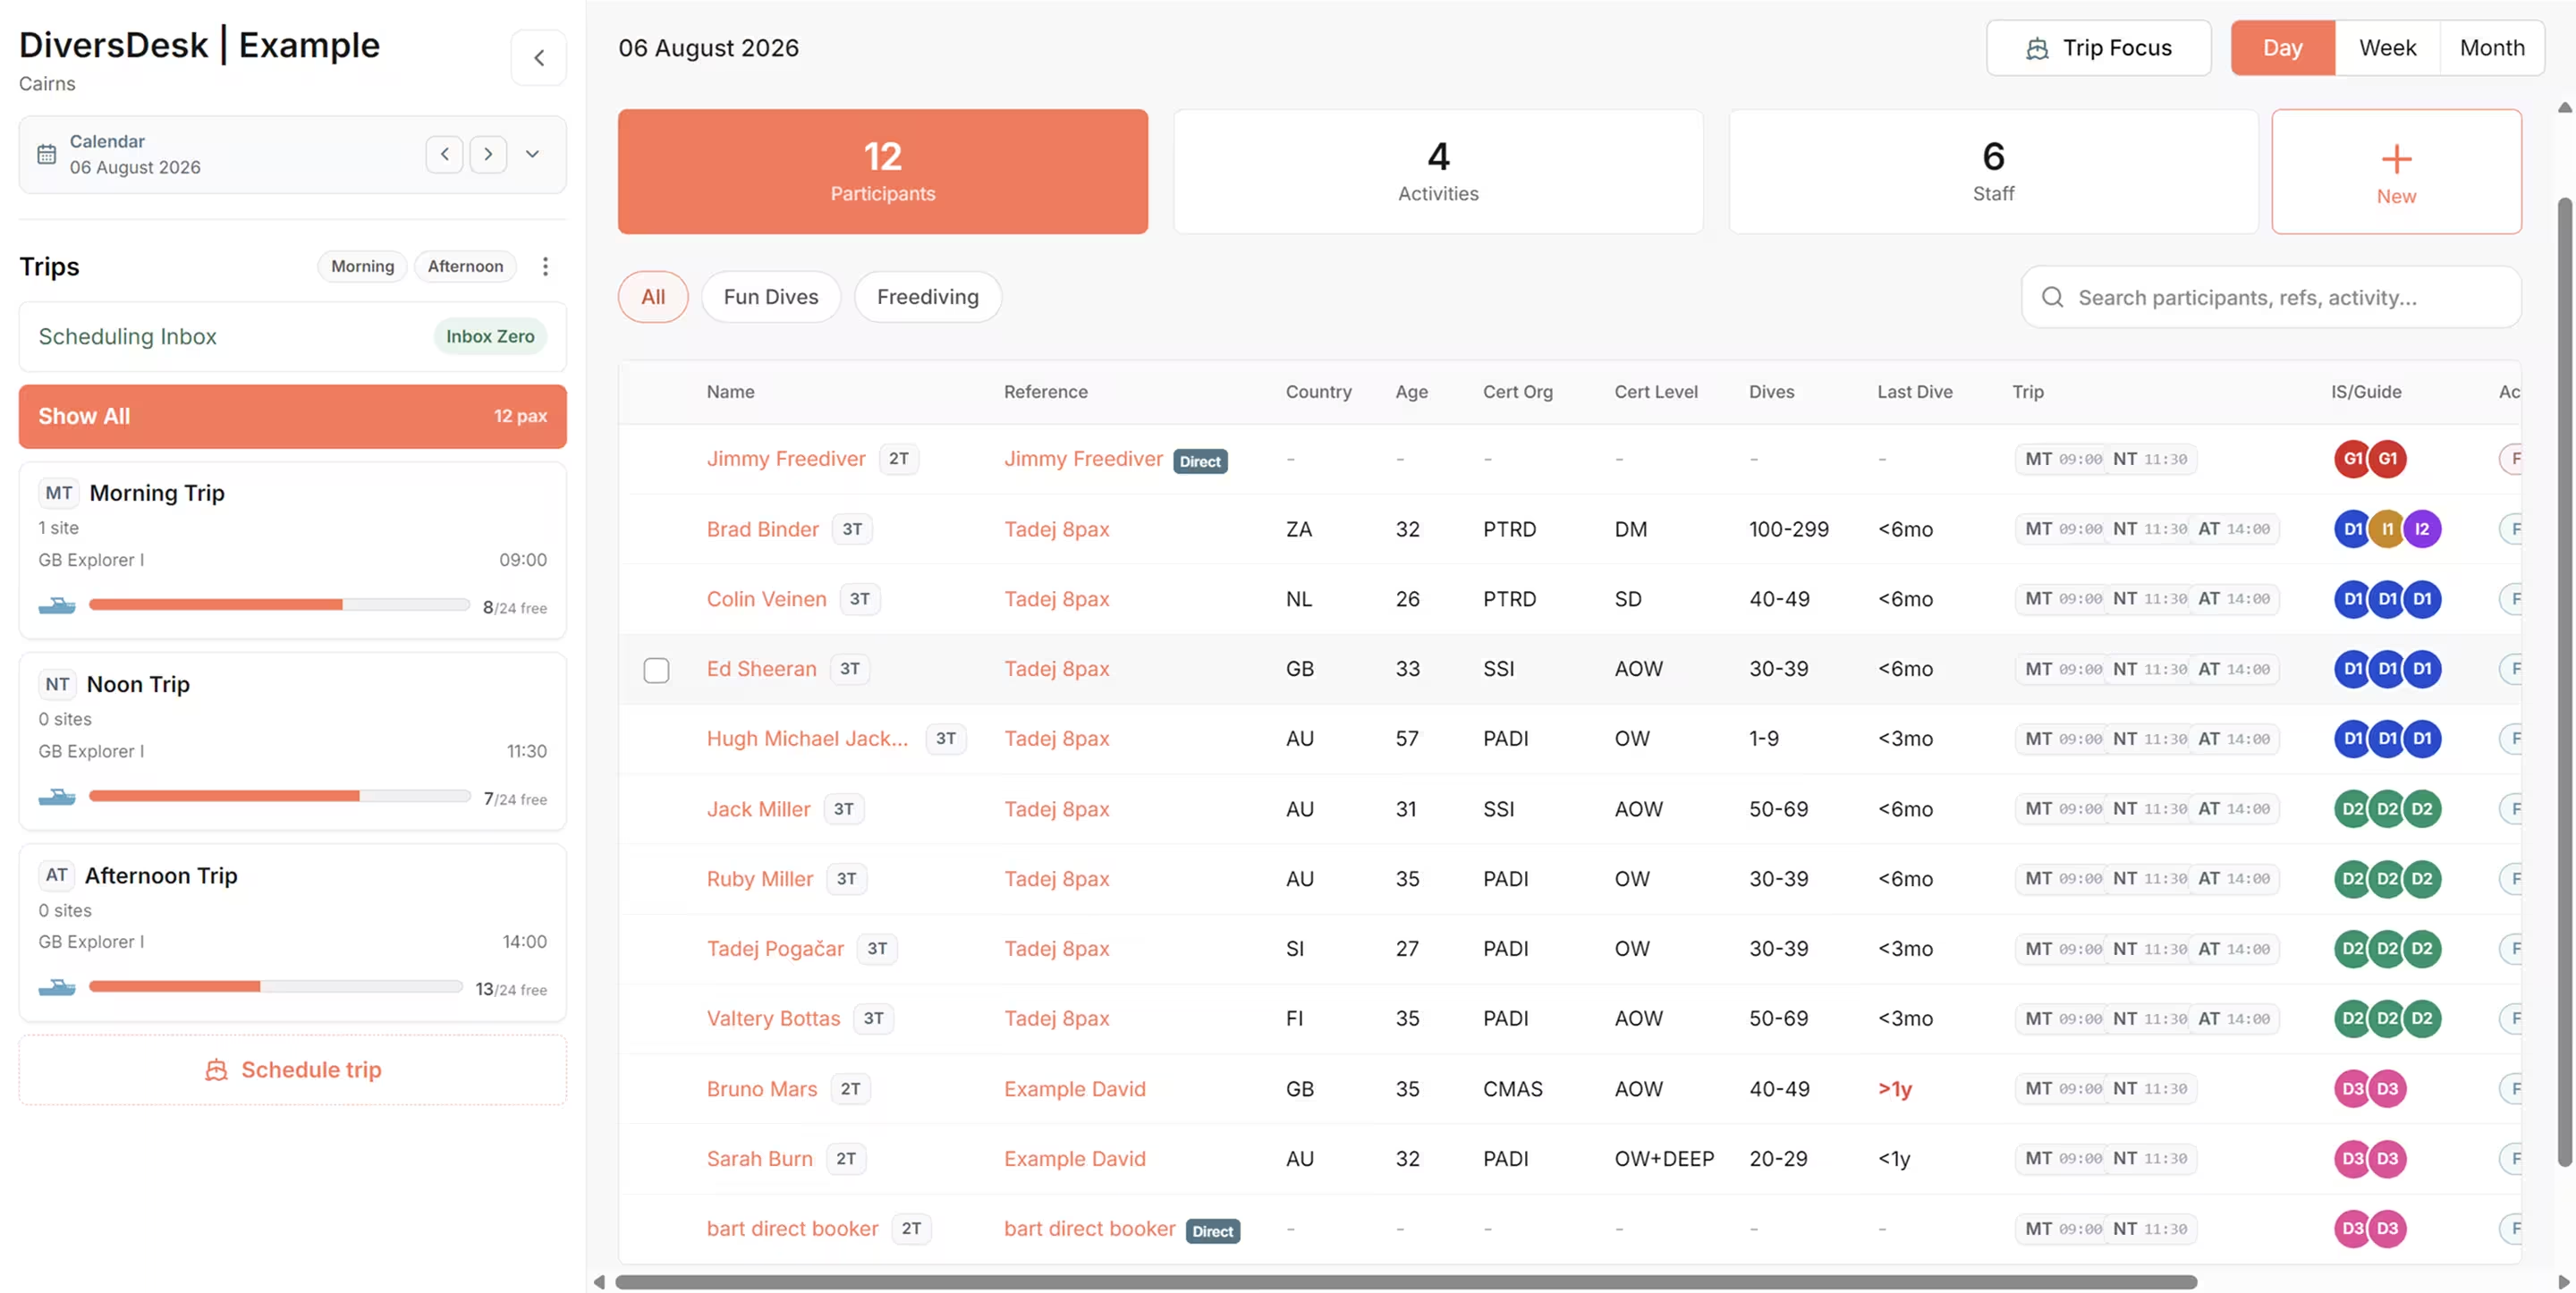
Find your way around
Section titled “Find your way around”Open Planner Beta from the main menu. Its controls are designed around four questions: what day am I looking at, what needs scheduling, where should it go, and who should be assigned?
Left panel
Section titled “Left panel”- The left panel is your planning switchboard. Use it to jump between trips, the inbox, and staff members without leaving the current date.
- In Trip Focus (Day view), the left panel shows the Scheduling Inbox, trip cards, and quick actions such as creating a new trip.
- In Staff Focus (Day view), the same panel switches to staff cards so you can assign, review, or remove guides and instructors quickly.
- In Trip Focus (Week and Month views), the left panel shows scheduled trip filters with start-time context, trip count, and participant count across the visible calendar period.
- In Staff Focus (Week and Month views), the left panel shows scheduled staff filters for the visible calendar period.
- When you select a participant, related trip or staff cards are visually muted/highlighted so you can immediately see where that participant is already scheduled or assigned.
- On desktop, the panel can be collapsed so you can work at full screen width. On mobile and tablet, a floating Trips or Staff button opens a bottom sheet with the same left-panel content and focus controls.
Focus controls
Section titled “Focus controls”Choose the focus that matches the decision you are making:
- Trip Focus groups the work around trips. Use it to schedule guests, review capacity, and move groups between trips.
- Staff Focus groups the work around your available and scheduled team members. Use it to review workloads and assign or remove guides and instructors.
The tabs change the level of detail without changing the current date or selection.
- Participants is the main working tab for guest-by-guest Scheduling and Assigning decisions. It is also the default tab when you open an inbox.
- Activities groups work by activity and course context. Use it for isolated insight per activity and to schedule participants for one specific activity or course more easily.
- Staff is available in Trip Focus for reviewing staff already connected to the selected trip. It is especially useful for quickly moving one staff member, including their assigned participants, to another trip. In collapsed groups, it also gives a clean per-staff capacity snapshot.
- In Staff Focus, the tab set changes to Participants, Activities, and Trips. Use Trips there to see which trips are attached to the selected staff member.
- In Activities, Trips, and Staff tabs, you can collapse section groups to reduce noise and get a cleaner insight into that day’s activities, scheduled trips, or assigned staff.
- Overview is the trip summary tab in Trip Focus and appears when a trip is selected. Use it for the selected trip’s main operational picture.
+New menu
Section titled “+New menu”Use the +New control in the planner header any time you need to create operational items without leaving the current date.
- Create booking starts a new booking flow from inside Planner.
- Add trip creates a new scheduled trip for the selected date.
- Add participants appears when a trip is selected and opens Scheduling Inbox context for that trip.
- Add rest day creates a rest-day trip entry for the date (shown only when a rest day does not already exist).
Use this menu when operations change mid-day and you need to add structure quickly without switching screens.
Date and view controls
Section titled “Date and view controls”- Day shows the detailed operational plan for one date. Use this for live Scheduling and Assigning.
- Week gives a seven-day overview for planning upcoming trips and workloads.
- Month gives a broader overview of trips and work still waiting to be scheduled.
- Use the date picker or previous and next controls to move through the calendar.
- In Day view, the date picker collapses automatically so the planner keeps more space for live scheduling. Expand it when you need to jump to another date.
Filters
Section titled “Filters”Use filters to narrow the current planning context without changing date or view.
- In Day view, activity type filters (such as fun dives, courses, snorkeling, and others) help you isolate one operational slice across tabs.
- In Trip Focus Day view, period filters such as Morning, Afternoon, and Night help you narrow visible trip cards by start-time period.
- In Week and Month views, Trip Focus uses scheduled trip filters, while Staff Focus uses scheduled staff filters.
Filter behavior is intentionally mixed between persistent and temporary context:
- Trip or staff selection can carry across focus and views so you can follow one operational context.
- Some view-local filters reset when focus context changes (for example between Trip Focus and Staff Focus) so each focus opens with the most relevant default.
- Active filters are shown in the left panel and near the top planner context heading, where you can quickly clear them.
Understand the inboxes
Section titled “Understand the inboxes”Planner Beta uses one inbox entry point in two different ways depending on the focus you choose.
The inboxes are designed to help you process planning decisions quickly until the inbox is empty.
- Use the inbox views to work toward inbox zero for Scheduling and Assigning.
- When you need to plan participants across more than one trip, you can continue from the Scheduled tab inside the Scheduling Inbox, the Assigned tab inside the Assigning Inbox, or switch to Show all and work from its tabs.
- This lets you move from queue-based processing to broader operational balancing without losing context.
Scheduling Inbox in Trip Focus
Section titled “Scheduling Inbox in Trip Focus”Use the Scheduling Inbox when guests still need to be placed onto a trip.
- Open it when a guest has no trip yet, when a trip was cancelled, or when you intentionally unschedule a guest for replanning.
- From here, move guests onto an existing trip or onto a newly created trip.
- If the work is already scheduled to a trip but still missing staff, switch to Staff Focus and use the Assigning Inbox.
- When all participants are scheduled, the inbox shows Inbox Zero.
- If scheduling is complete but some participants are still unassigned, the inbox also shows a quick prompt to jump directly to the Assigning Inbox in Staff Focus.
Assigning Inbox in Staff Focus
Section titled “Assigning Inbox in Staff Focus”Use the Assigning Inbox when work already belongs to a trip but still needs an instructor, guide, or other staff assignment.
- Open it to find trips or guest groups that are scheduled but not yet assigned to a staff member.
- Use it when a guide becomes unavailable and the work needs a replacement.
- You can also assign staff before a participant is scheduled on a trip. This lets you prepare staffing decisions first, then complete trip Scheduling afterward.
- If the issue is that guests do not yet have a trip, switch back to Trip Focus and use the Scheduling Inbox instead.
- When all required assignments are completed, the inbox shows Inbox Zero.
- If assigning is complete for current visible items but participants are still unscheduled, the inbox shows a quick prompt to jump back to the Scheduling Inbox in Trip Focus.
Deduplicated participant views
Section titled “Deduplicated participant views”- Show all, Scheduling Inbox, and Assigning Inbox are deduplicated participant views.
- In these views, each participant is shown as a single row even when that participant is scheduled on multiple trips or activities on the same day.
- The key exception is potential double bookings: when the same person appears in different bookings on the same day, separate rows can remain visible and the planner marks them as possible duplicates.
Visual cues, avatars, and badges
Section titled “Visual cues, avatars, and badges”The planner uses compact badges so you can read the day quickly without opening every row.
Staff avatars and initials
Section titled “Staff avatars and initials”- Staff members are shown as colored circular avatars with their initials.
- Initials are generated from the name (typically first and last initial). For duplicate or ambiguous initials, the planner auto-adjusts labels to keep each staff avatar unique.
- The same initials are reused across the planner so you can match the same person in left-panel cards, staff views, and participant rows.
- If a staff member is unavailable, the planner marks that status directly on the staff card.
Trip badges and initials
Section titled “Trip badges and initials”- Trips are shown with short initials based on the trip name or activity location.
- These trip badges appear in the left panel, on participant rows, and in compact trip references.
- When available, the trip start time is shown next to the initials so you can distinguish similar trips quickly.
Participant and booking badges
Section titled “Participant and booking badges”- A participant with more than one trip on the same day gets a trip-count badge such as
2T. - A participant with more than one activity on the same day gets an activity-count badge such as
2Aand may appear as Multiple activities in the row. - A possible duplicate participant on the same day is marked with an exclamation badge. Treat this as a warning to check whether the same person was booked twice under different booking records.
- A Direct badge marks a direct webshop booking.
- A clock or timer icon marks a direct booking that is still waiting for approval.
Staff avatar badges in Staff Focus
Section titled “Staff avatar badges in Staff Focus”Staff cards in the left panel use a summary badge to show workload at a glance.
- The badge shows x pax when the staff member is currently tied to one trip and the planner can summarize the workload as participant count.
- The badge shows x trips in a dark highlighted style when that staff member is working across multiple trips in the current view.
- The badge turns red when at least one assigned trip exceeds the activity’s max pax per guide.
Guide-limit warnings
Section titled “Guide-limit warnings”- In participant rows, staff avatars in the IS/Guide column get a red warning outline when guide capacity is exceeded for that trip context.
- In staff-focused summaries (including collapsed staff groups and overview-style lists), guide-limit warnings are surfaced with red warning styling so overloaded assignments can be spotted quickly.
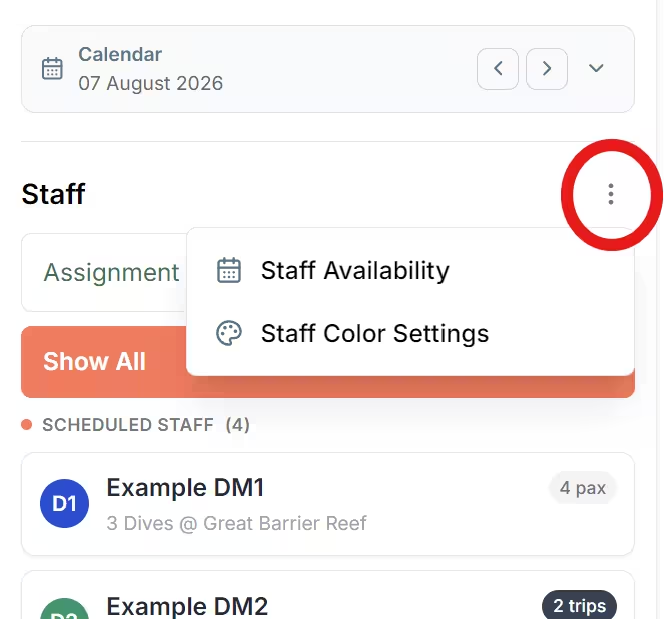
Staff colors
Section titled “Staff colors”- Each staff member can have a planning color.
- In Staff Focus, select the ellipsis next to the Staff heading in the left panel to set or update staff planning colors.
- In the side panel, use Auto-assign colors to give staff members distinct colors automatically, or select a color manually for each staff member.
- The selected color is reused on staff avatars, assigning badges, and other planning indicators to make scanning easier.
Plan a trip from start to finish
Section titled “Plan a trip from start to finish”- Open the date you want to operate.
- In Trip Focus, select an existing trip or use Schedule a trip in the left panel to quickly schedule a trip from an available template or create a new trip.
- Review the trip’s type, time, boat, capacity, and current guest count.
- Open Unscheduled and select the guests for that trip.
- Drag the selected guests onto the trip, or use the selection action to choose the target trip.
- Switch to Staff Focus or use the selection action to assign an instructor or guide.
- Review capacity and guide-to-guest warnings, then confirm the change.
This flow works for a normal day of fun dives, a course group, or an activity that needs to be split over more than one trip.
Rest day vs non-consecutive days
Section titled “Rest day vs non-consecutive days”These two concepts solve different operational problems:
- Use Rest day when the dive operation should intentionally pause activity execution on a date. This is useful for weather holds, maintenance windows, or planned no-dive recovery days.
- Use Non-consecutive days when a participant’s activity package is still active but should not run on back-to-back dates. This is common when guests spread dives across separate calendar days.
Practical rule:
- If the operation day itself should be marked as a no-run day, use Rest day.
- If the guest schedule pattern should skip days while the package continues, use Non-consecutive days.
Trip overview and editing
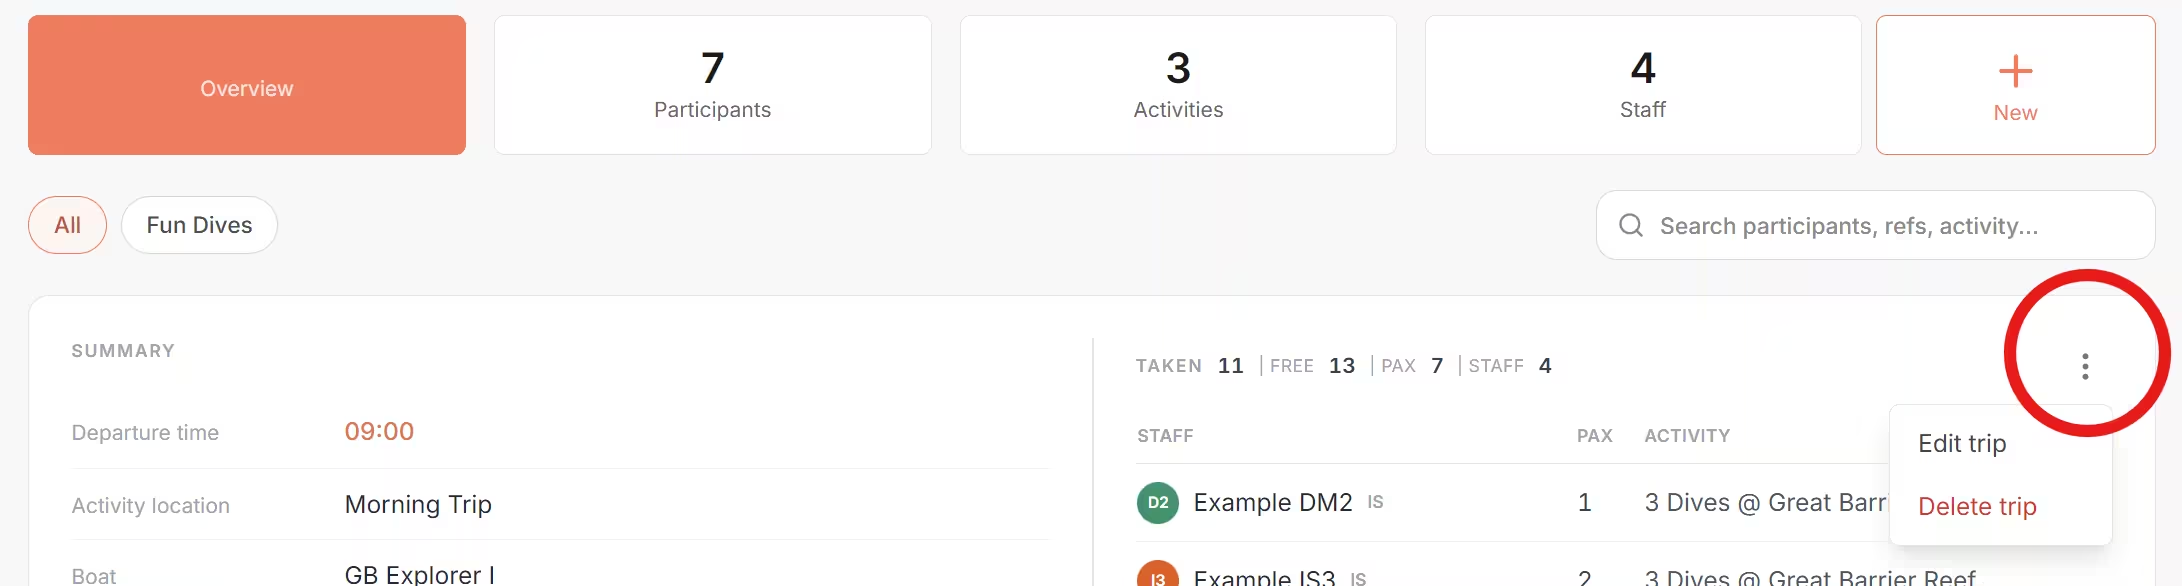
Section titled “Trip overview and editing”- In trip overview, departure or start time and sites (where applicable) can be adjusted directly while planning.
- Use the trip ellipsis menu and Edit trip for broader trip edits.
- Typical edits there include adding a captain, adding crew who are not assigned to a participant, changing capacity, and adjusting other trip settings.
- To delete a trip, use Delete trip from the trip ellipsis menu in Trip Overview. You can also select the trip and press Delete on your keyboard; see Delete key trip action. The planner asks for confirmation before removal and unschedules the affected participants.
Drag and drop
Section titled “Drag and drop”Drag and drop is for fast planning changes while keeping the result visible.
Schedule unscheduled guests
Section titled “Schedule unscheduled guests”Select one or more guests from Unscheduled, then drag the selection to the trip that should run them. Confirm the decision when prompted.
You can also drag directly into the Drop to schedule trip box for the same outcome.
Move guests between trips
Section titled “Move guests between trips”Select the guest or group on its current trip and drag it to the destination trip. This is useful when you need to rebalance capacity, consolidate a lightly booked trip, or react to a boat change.
If the participant is already scheduled, the planner shows a decision dialog so you can choose whether to schedule again on the destination trip or move the participant over from the original trip.
Unschedule guests
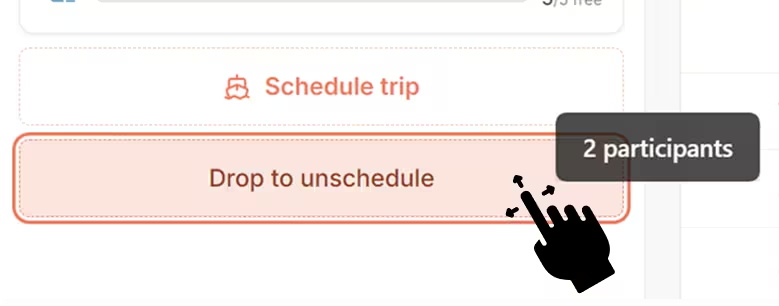
Section titled “Unschedule guests”Drag selected guests back to Unscheduled when the trip should no longer include them. This removes the trip assignment so the guests remain visible for replanning.
You can also drag directly into the Drop to unschedule box. For participants already attached to multiple trips, a dialog appears so you can choose which trip assignment to remove.
Assign or unassign staff
Section titled “Assign or unassign staff”In Staff Focus, drag a selected trip or guest group onto the relevant team member to assign them. Move work back to the unassigned area to remove staff assignments when a shift changes.
You can also drag directly into Drop to assign in Staff Focus. If the participant is scheduled on multiple trips, a dialog appears so you can choose which trip the assigning action should apply to.
The planner may ask you to choose how to handle mixed selections or multiple affected trips. Confirm only after reviewing the result shown in the dialog.
Multi-trip and multi-activity planning
Section titled “Multi-trip and multi-activity planning”Planner Beta supports more than one trip or activity for the same participant on the same day.
Multi-trip scheduling
Section titled “Multi-trip scheduling”- A participant can remain scheduled on more than one trip on the same day when that reflects the real plan.
- When you move or reschedule a mixed selection, the planner may ask whether guests should stay on their original trips or be removed from them.
- Use the trip-count badge to spot these participants quickly before making another change.
- Staff assignment badges are shown per trip. If a participant is on three trips, you can see three trip-specific staff badges in sequence.

Multi-activity participants
Section titled “Multi-activity participants”- A participant can also have more than one activity on the same day.
- Use the Activities tab when you need to understand or rebalance mixed-product days.
- The activity-count badge helps you spot participants whose planning needs to be checked across more than one activity.
Carrying staff over to a new trip
Section titled “Carrying staff over to a new trip”- When you create or schedule a new trip from selected work, the planner carries the staff member over automatically if all selected source assignments point to the same staff member.
- If the selected work comes from mixed staff assignments, the planner creates the new trip without a carried-over staff assignment so you can decide the correct guide or instructor manually.
Bulk actions
Section titled “Bulk actions”Select multiple guests to make one coordinated change. The selection action bar lets you set a target trip and assign an instructor or guide for the whole selection.
For multi-trip operations, the bulk action bar supports assigning participants across multiple trips in one action. Use the trips dropdown in the bulk edit bar to select the specific trips that should be included.
Bulk actions are useful for:
- Assigning an entire course group to the same trip and instructor.
- Moving guests from a cancelled boat to a replacement trip.
- Reassigning several groups after an instructor becomes unavailable.
- Removing selected guests from their current trip without opening each booking separately.
When the selection contains guests from different trips, the planner identifies this as a mixed selection. Check the action summary before applying the change so that you do not unintentionally move work from more than one trip.
For mixed multi-trip selections, review state indicators before confirming:
- Trip Scheduling states: Already scheduled, Will unschedule, and Will schedule.
- Staff Assigning states: Partly assigned, Will assign, and Will unassign.
These states are especially important when one selection includes participants coming from different trips, different assigning statuses, or both.
Power user shortcuts
Section titled “Power user shortcuts”Use these shortcuts to speed up high-volume Scheduling and Assigning work.
Shift range selection
Section titled “Shift range selection”- Select one participant checkbox, then hold Shift and select another checkbox to select the full range in between.
Ctrl row selection
Section titled “Ctrl row selection”- Hold Ctrl and click on a participant row to toggle row selection quickly without having to target the checkbox precisely.
Number-key quick selection
Section titled “Number-key quick selection”- With the participant list focused, use number keys to select several upcoming participants in one action.
- This is useful for quickly taking 4 or 5 participants into a bulk Scheduling or Assigning action.
Delete key trip action
Section titled “Delete key trip action”- In Day view, with a trip selected, press Delete to open the trip deletion confirmation flow.
Manage capacity and overbooking
Section titled “Manage capacity and overbooking”Each trip shows its current capacity position. Before an assignment is applied, the planner checks whether the selected guests would overbook the trip. It also checks guide-to-guest limits when you assign an instructor or guide.
When a trip is over capacity, the planner marks it with an Overbooked badge and shows how many participants are over the limit (for example, x over) in trip cards.
When you see a warning:
- Check the trip capacity and the number of selected guests.
- Check whether another trip has availability.
- Review the guide’s current workload and the relevant guide-to-guest limit.
- Continue only when the exception is operationally intended.
The overbooking dialog is there to stop accidental overscheduling before the change is applied. Treat it as a deliberate decision point, not as an informational note.
Staff assigning and workload planning
Section titled “Staff assigning and workload planning”Use Staff Focus to see which members are scheduled, available, or unavailable. Team members are shown with their role and assigned workload, making Assigning decisions faster and clearer.
Typical use cases include:
- Assign an available divemaster to a new fun-dive trip.
- Check that a course has an instructor before the day begins.
- Move a group to another guide when a staff member calls in sick.
- Unassign staff when a trip is cancelled, then use the availability view to plan their next assignment.
Trip templates
Section titled “Trip templates”Use Manage trip templates from the trip settings menu to maintain repeatable trip setups. Templates help teams create familiar trip structures consistently, instead of rebuilding the same operational details each day.
Use templates for recurring morning, afternoon, or night trips, standard boat runs, or routine course schedules.
Templates are especially useful when:
- the same trip pattern runs most days,
- the boat, time, and operational setup repeat often, or
- a team wants the same standard trip structure across different operators.
If you create a new trip from a recurring pattern, start from a template instead of rebuilding the trip by hand.
Mobile operation
Section titled “Mobile operation”Planner Beta also supports mobile operation, but the layout becomes more compact.
- On mobile, the planner surfaces the current date, focus, and selection in a compact top area instead of relying on the full desktop sidebar.
- A floating Trips or Staff button opens a bottom sheet that slides in and shows the same trips/staff context as the left panel, including focus switching.
- Selected trips, staff members, and inbox states are shown as compact header chips so you can see what you are editing before you act.
- Participant work is presented in a tighter, card-like flow rather than a wide desktop planning table.
- On tablets, cards can render in two columns when space allows.
- On wider tablet landscape layouts, the planner can shift back to the standard table-style desktop layout.
- Use mobile for live operational adjustments, confirmations, and quick reassignment checks; use desktop when you need the broadest overview of a complex day.
Common operational scenarios
Section titled “Common operational scenarios”A guest arrives without a trip
Section titled “A guest arrives without a trip”Open Unscheduled, filter to the relevant activity if needed, select the guest, and drag them to the appropriate trip. Review capacity before confirming.
Weather forces a boat swap
Section titled “Weather forces a boat swap”In Trip Focus, select the affected guests and move them to the replacement trip. If the group should be split, make separate selections so each destination and capacity check is clear.
A course runs over several days
Section titled “A course runs over several days”Use Day, Week, or Month view to open each scheduled date, then organise the guests and instructor for that day’s trip. Use filters to keep the course activity visible while planning the surrounding operation.
An instructor is no longer available
Section titled “An instructor is no longer available”Switch to Staff Focus, find the affected assignments, select the relevant guests or trip, and assign an available replacement. The workload and guide-limit information helps you check the result before saving.
You need a quick shift handover
Section titled “You need a quick shift handover”Open the current Day view, clear filters to see the whole operation, then use Trip Focus to review guest placement and Staff Focus to check team assignments. Resolve anything left in Unscheduled before handover where possible.
Working safely in beta
Section titled “Working safely in beta”Review confirmation dialogs, capacity indicators, and guide-limit warnings before finalising a change. Share feedback with the Diversdesk team when a planning task is unclear or does not match your real operational flow; include the date and the steps you took so the issue can be reproduced.