Customer Registration/Booking Methods
Intro to Diversdesk’s Onboarding Flexibility
Section titled “Intro to Diversdesk’s Onboarding Flexibility”From a broad perspective, Diversdesk supports three main customer onboarding methods:
-
This method involves creating a booking and sharing a booking URL with your customer. The customer can immediately register and pay, if payment is added, and the registration will automatically appear in your calendar and dashboard.

-
Customers register through a Generic Customer Registration Page, which includes all onboarding methods you have marked as selectable for participants. This is useful for walk-in customers who can register through a QR code in your dive center, even when no one on location has access to Diversdesk. Self-registered customers will appear as pending in your environment and can be connected to a booking later.

-
Through Self-Bookings or Direct Bookings, customers can book themselves for an activity of choice on a date of choice. This lets you automate the booking and registration process by allowing customers to book directly into your scheduler. You will receive a notification for every self-booking.

All three methods offer a variety of features to enhance the onboarding experience, which we will dive into below.
1. Managed Bookings
Section titled “1. Managed Bookings”By adding an activity on the Planner page, and thereby creating a new booking, you can follow these paths to onboard your customer:
-
1.1. Share the Booking URL (Most common)
This is the most common way of onboarding new customers. After sharing the booking URL, basically everything is taken care of for you.
-
1.2. Send a Personalized Email
This is useful for centers that want to give an extra personal touch and prefill certain data based on conversations with the customer before making a sale.
-
1.3. Select an Existing Registration
Existing registrations can easily be connected after the booking is created.
Each method is described in the appropriate steps below.
1.1. Share the Booking URL
Section titled “1.1. Share the Booking URL”- Create a booking for the desired activity.
- Share the booking with your customer.
- Select the medium you want to use to share the unique URL.
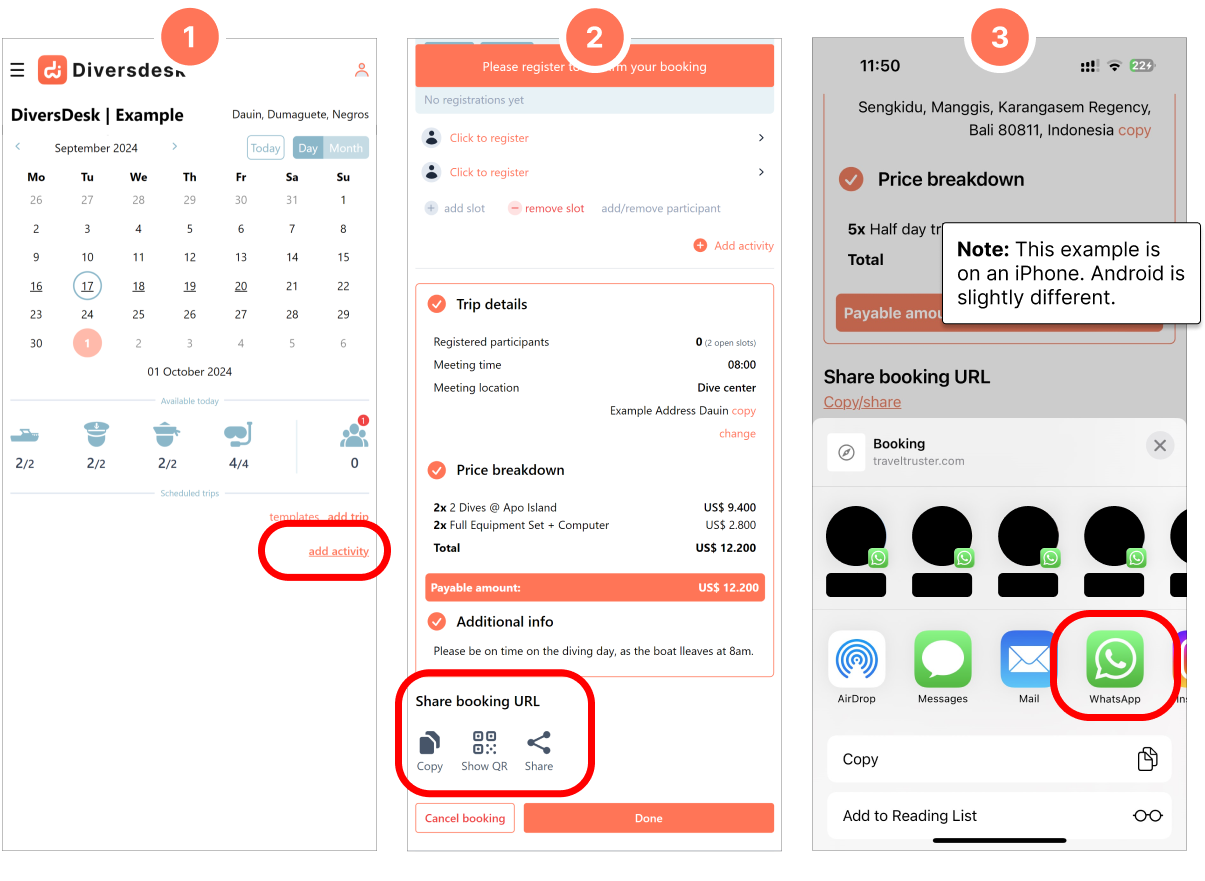
- Your customer can access the booking through the URL you shared. In this example, the URL is shared via WhatsApp.
- Each person or group member accessing the shared URL can review the activity and billing details and will be prompted to register and pay if required.
- The registration button directs customers to the appropriate registration form and any required paperwork for this product.
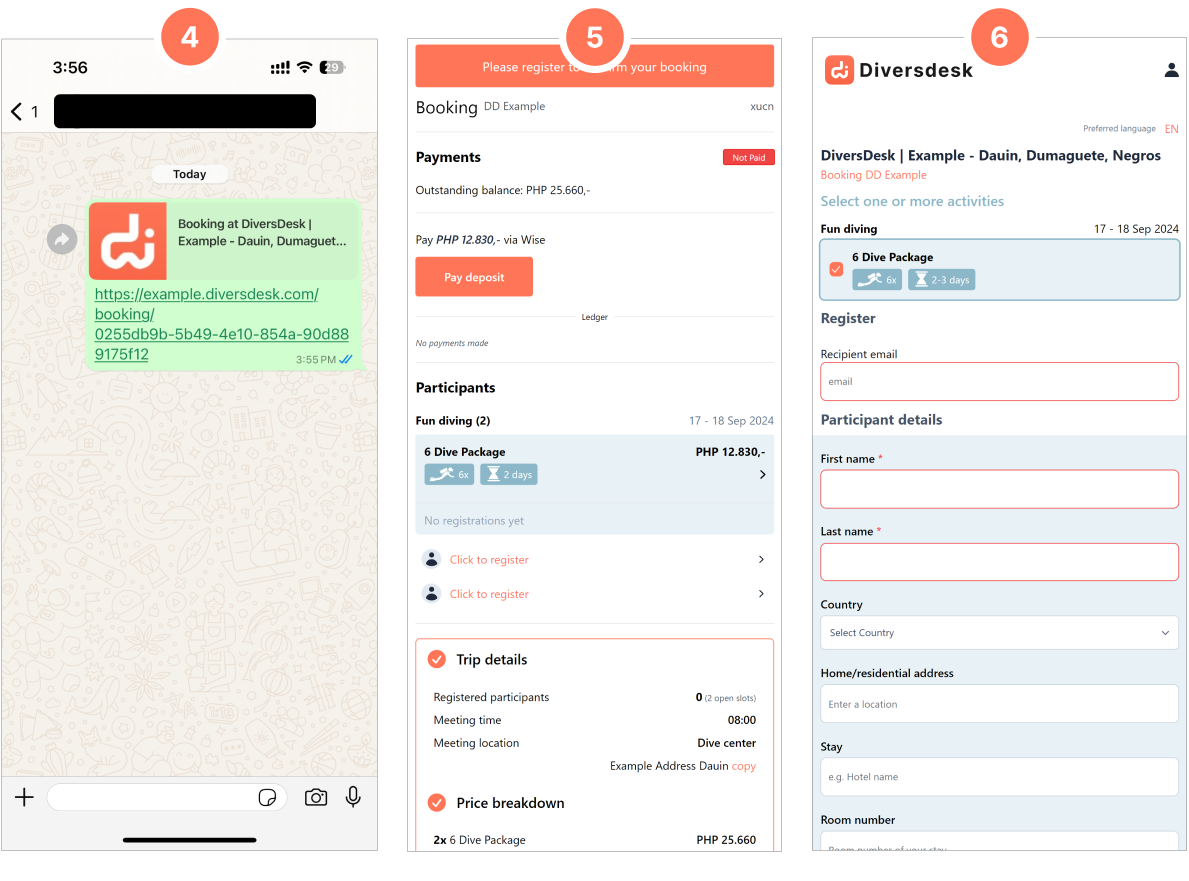
The URL can also be shared among the members of the booking so every individual can register until the available registration slots are filled.
1.2. Send a Personalized Email
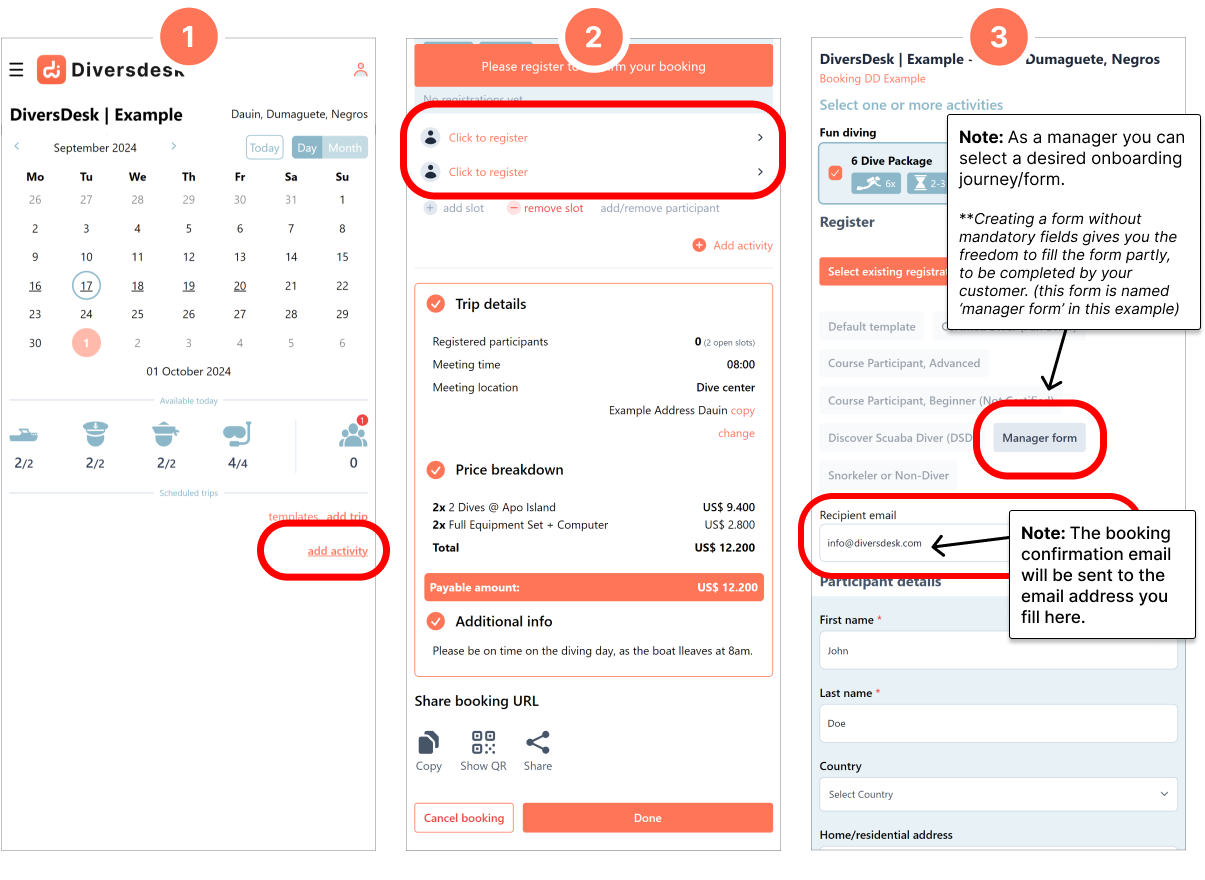
Section titled “1.2. Send a Personalized Email”After creating an activity, a user with manager rights can fill the desired fields of the registration form.
You can fill up all the desired fields on behalf of the customer, or simply stick to the bare minimum. e.g. Name and email.
- Create an activity through the Add Activity hyperlink within your Planner hub.
- Select Register using the hyperlinks below the products or the sticky button at the top of your screen.
- Fill the customer details you want to fill for this particular customer.
1.3. Select an Existing Registration
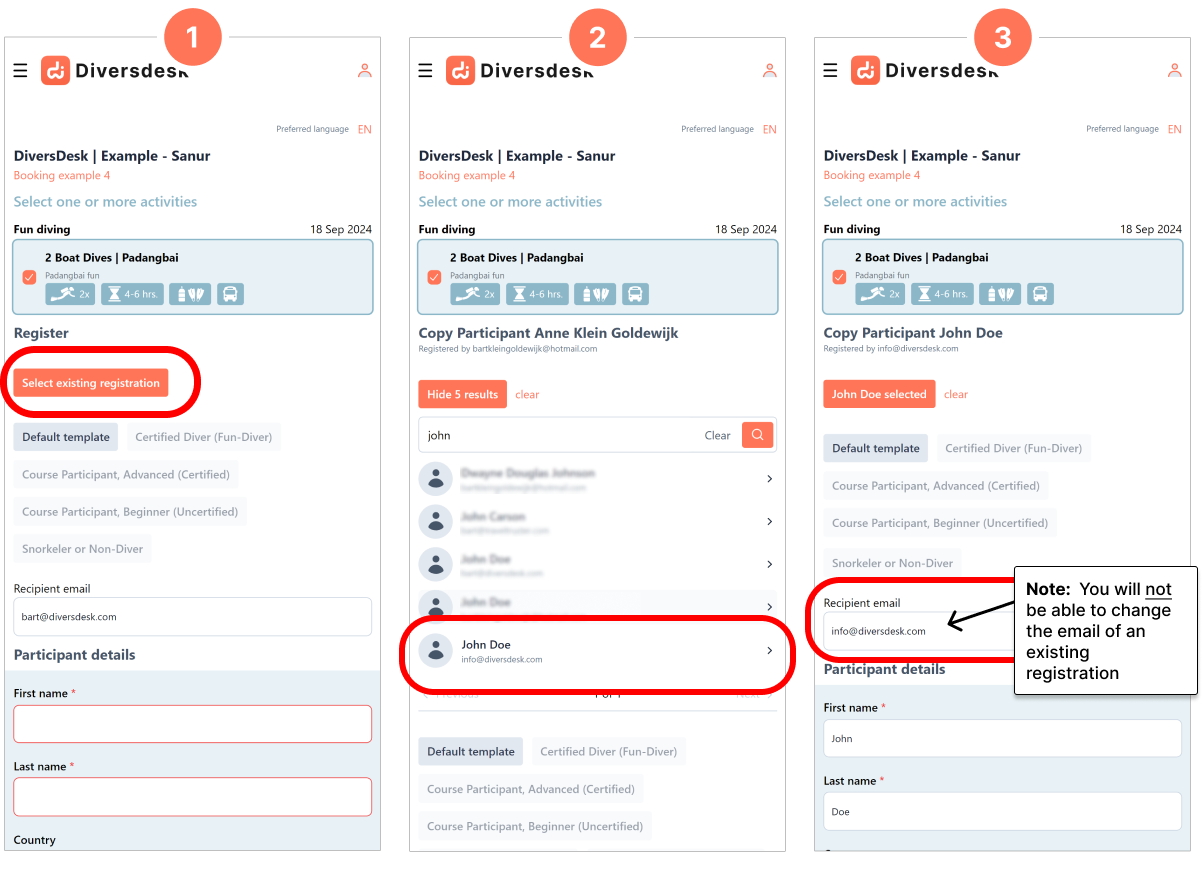
Section titled “1.3. Select an Existing Registration”For returning customers, you can select an existing registration from your database. All fields will be pre-filled based on the most recent registration of that participant. If previously signed waivers remain valid for the entire duration of the activity, no additional signatures will be required and your customer can right away start the activity.
An existing registration can also be found through the Register button or hyperlinks below the activity cards within the booking.

- Press Select existing registration after navigating to the registration page.
- Search for and select a returning customer profile.
- The registration form fields are prefilled from the previous registration.
2. Self-Registrations (Generic Onboarding)
Section titled “2. Self-Registrations (Generic Onboarding)”Generic Customer Registration Page
Section titled “Generic Customer Registration Page”A customer can select one of the options you have created on the ‘Generic Customer Registration Page.’ You can find this page through the menu by navigating to → Forms and selecting the button shown in the image below.
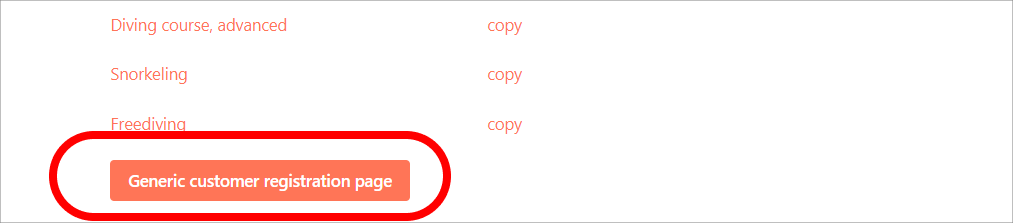
Making an Onboarding Journey Selectable for Your Customer
Section titled “Making an Onboarding Journey Selectable for Your Customer”On the Forms page, you can create onboarding journeys and indicate through the checkbox inside each journey if you want to display them on the “Generic Customer Registration Page.”
- Navigate to the Forms page through the hamburger menu at the top left of your screen.
- Click Edit on the customer onboarding journey you want to appear on your Generic Customer Registration Page.
- Check the box to make this onboarding journey visible on your Generic Customer Registration Page.
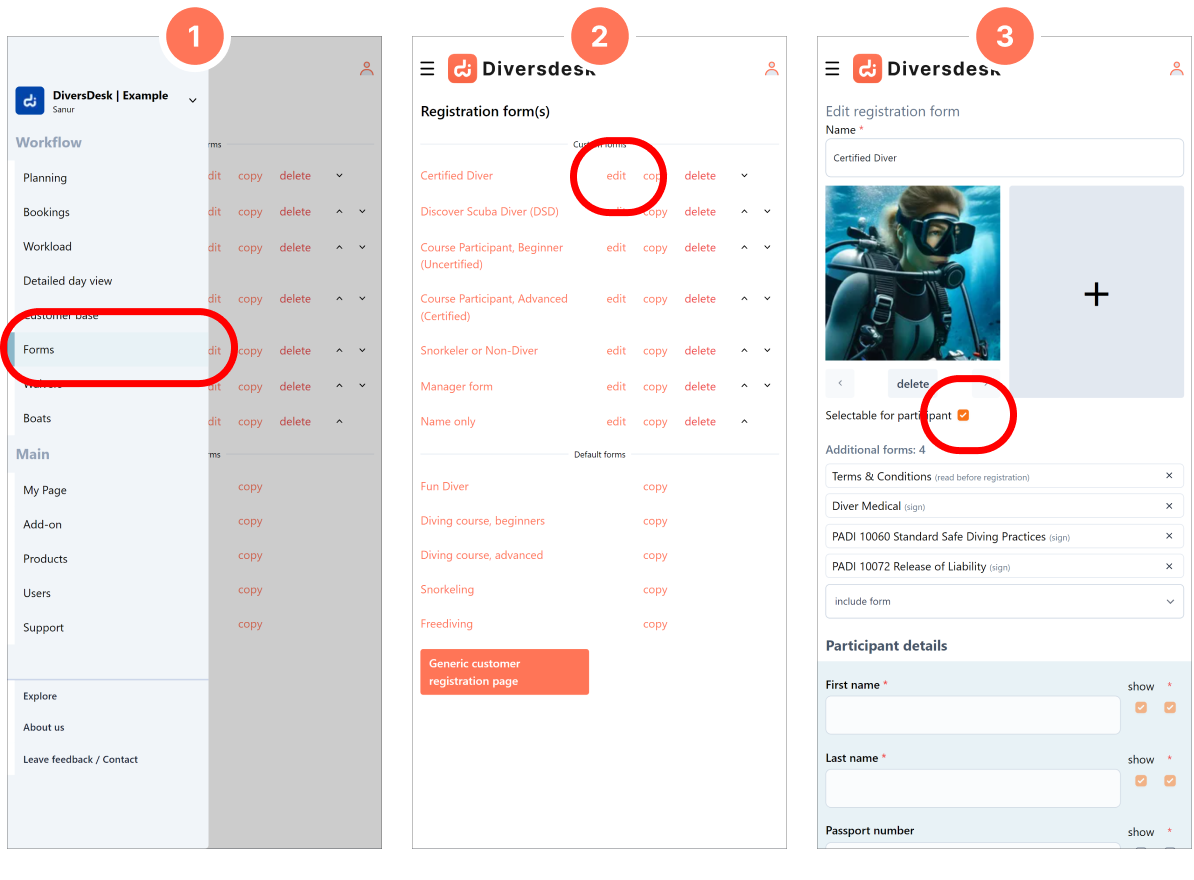
Sharing the ‘Generic Registration Page’
Section titled “Sharing the ‘Generic Registration Page’”You can easily share the ‘Generic Customer Registration Page’ in the same way you would normally share a booking URL.
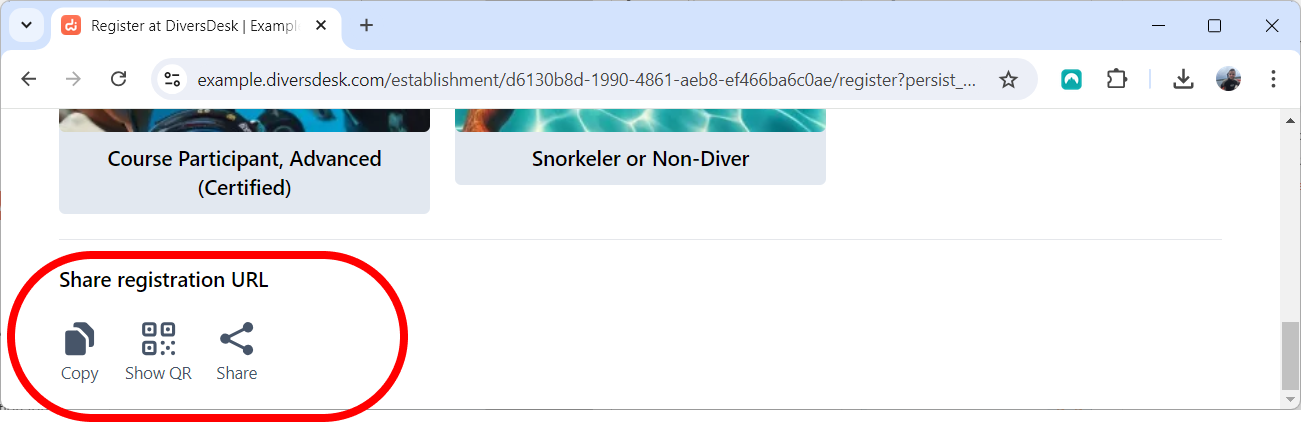
We recommend printing and displaying the QR code for this page in your Dive Center. This allows every walk-in to register immediately, letting you focus on talking to customers and other tasks while ensuring you capture their data and never miss a sale.
Customer Registration Flow
Section titled “Customer Registration Flow”Once shared with the customer, the customer can select the correct journey and fill out the appropriate paperwork attached.
- A customer selects the option that best describes them.
- They can immediately begin filling out the necessary paperwork for their chosen onboarding journey.
- After completing the registration form, the registration page appears, where the customer is prompted to sign or fill out any additional paperwork or waivers associated with that onboarding journey.
- After submitting the registration form, the customer also receives an email with information and a link to the registration page.
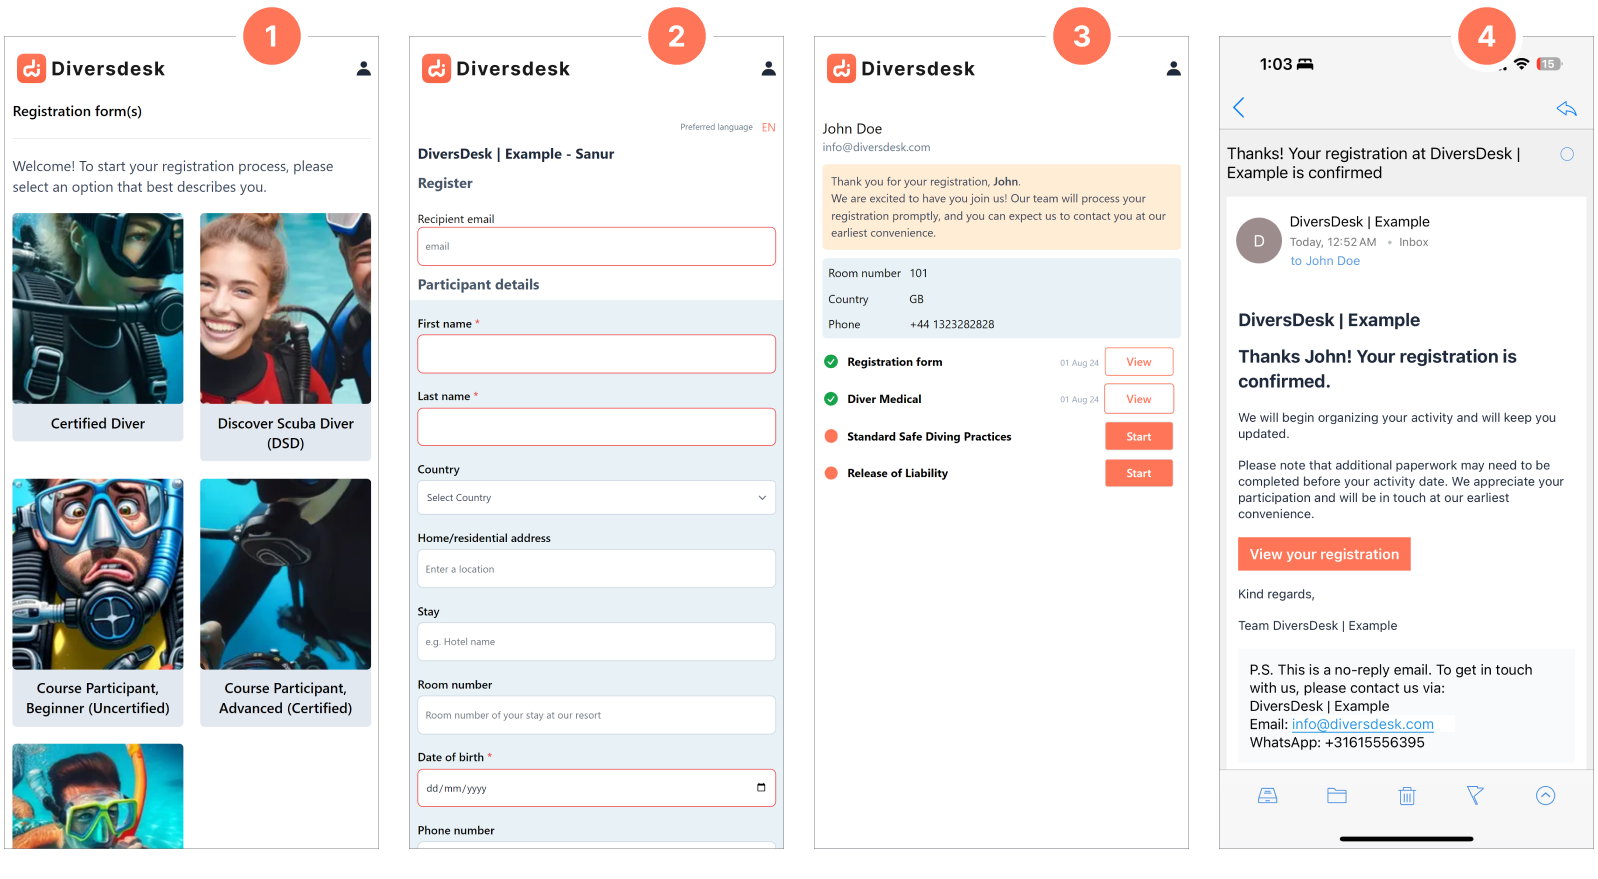
Your customer will now appear in your environment as pending, allowing you to connect them to a booking.
3. Self-Booking (Direct Booking)
Section titled “3. Self-Booking (Direct Booking)”By activating the ‘Self-Booking’ functionality, you can accept direct bookings through your website by redirecting your customer to ‘My Page’, the activity/product page, or directly to step 1 of the self-booking process. You can, of course, also simply share the URL to ‘My Page’ or any of the other URLs mentioned after having a chat with your customer.
When starting this onboarding process, your customer is asked to fill in the required details to create a booking. This can be a minimalistic page to capture essential data only, or the complete registration form. You’re free to set this up as you prefer. In step 2, your customer is asked to complete any remaining paperwork required for the onboarding journey related to the activity. Read everything you need to know about Self-Bookings in this article.