Day Manifest
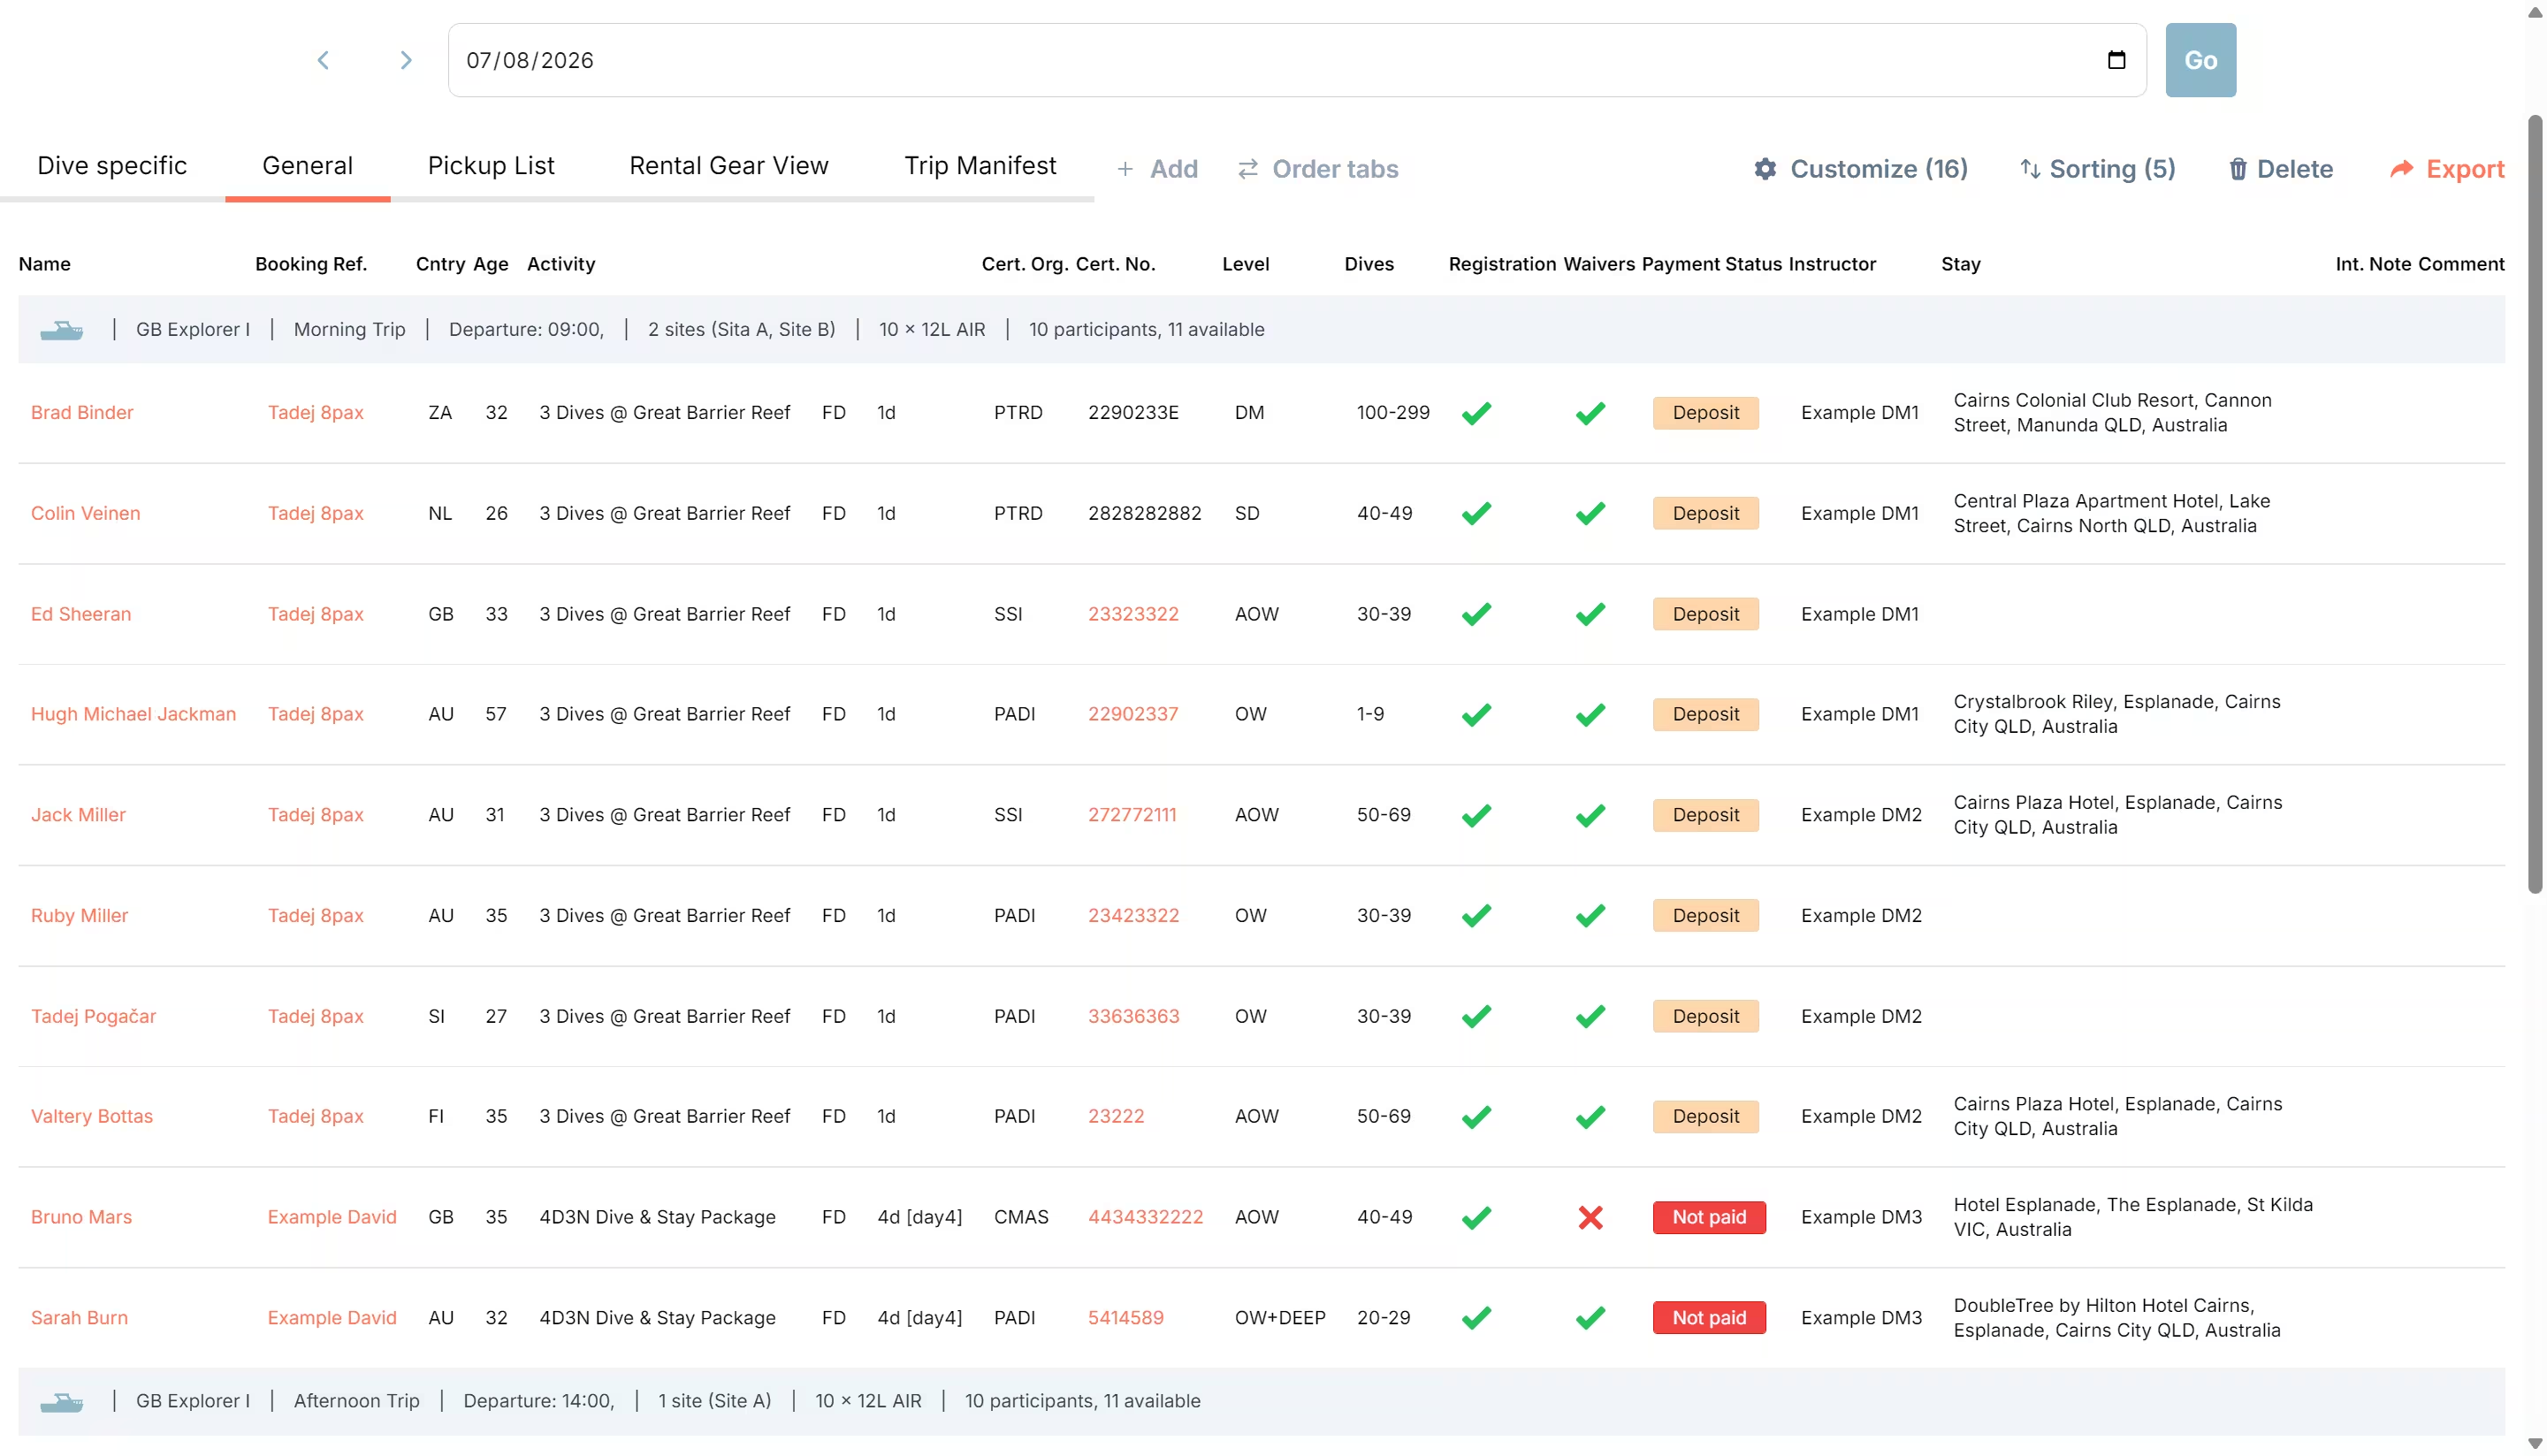
The Day Manifest page (also referred to as the Detailed Day view) is your operational control panel for a selected day.
It is designed as a fully customizable list view where each role can focus on the information they need most.
Access Rights
Section titled “Access Rights”By default, Day Manifest is accessible to:
- users with manager-level access
- staff members who were explicitly granted Staff+ rights
Staff+ rights are operationally limited.
- Staff+ can use Day Manifest in read-only mode for most data.
- Staff+ can still perform specific actions: adding comments and updating pickup/meeting time and address.
Instructors or guides can use Day Manifest when their account has the required access rights.
Open Day Manifest
Section titled “Open Day Manifest”- Open Participants from your operational menu (this is the Day Manifest/Detailed Day view).
- Use the day navigation at the top to select the date you want to manage: use the left/right arrows to move to previous or next days, or use the date field to type a date or choose one from the date picker.
- Select the tab (view) that matches your workflow.
What You Can Manage From Day Manifest
Section titled “What You Can Manage From Day Manifest”Use Day Manifest to:
- monitor registration completion
- monitor waiver status
- monitor payment status
- review sizes and gear-related details
- run trip and pickup logistics from one place
- manage comments and internal operational notes
- export your active view to CSV
Because the view is customizable, you can create different operational tabs for different purposes, for example:
- a trip manifest tab for trip operations
- a pickup tab for transfer and routing tasks
- a registration and payment follow-up tab for front desk workflows
Customize Tabs and Columns
Section titled “Customize Tabs and Columns”You can create tabs based on your team workflow and choose which columns are visible in each tab.
The most effective setup is usually unique to your operation, not a one-size-fits-all template.
When designing your tabs, align each tab to a real responsibility during the day. Keep each view focused so one role can complete its tasks without scanning unrelated information.
Good practice is to decide per tab:
- who owns the tab (front desk, ops, captain, pickup team, etc.)
- which decisions that role needs to make
- which columns are essential to make those decisions quickly
This approach keeps workflows clear, reduces handoff errors, and makes Day Manifest faster to use during peak hours.
Registration Data and Unit Conversion
Section titled “Registration Data and Unit Conversion”Many available columns are sourced from participant registration data. Size and measurement values entered by customers are automatically shown in your establishment default units, configured under Settings > General.
This keeps operational views consistent even when guests register using different units.

Recommended Tab Setup (Inspiration)
Section titled “Recommended Tab Setup (Inspiration)”Many teams use a tab setup like this:
- General / Front Office: registration status, waivers, payment status, booking reference, comments.
- Dive Ops / Gear: sizes, own gear, instructor, activity, gear check.
- Harbor / Port Authority Sheet: trip time, trip type, trip title, boat name, captain, crew, participant essentials.
- Pickup List: meet, time, location, contact number, comments.
You can copy and adjust these examples to match your operation.
What Each Link Does
Section titled “What Each Link Does”Day Manifest includes clickable fields that open specific tools quickly.
Name Column
Section titled “Name Column”Click the participant name hyperlink to open the participant side panel.
From that side panel, you can:
- manage the participant’s trip assignments
- manage gear check and assigned rental gear
- manage tanks and blends per trip assignment
- review add-ons connected to person and activity
Inside the same panel you can also jump to:
- the participant registration details page (via the name hyperlink)
- the booking page (via the booking reference hyperlink)
Reference guide: Registration Page
Booking Reference Column
Section titled “Booking Reference Column”Click the booking reference hyperlink to open the booking page directly.
Cert. No. Column
Section titled “Cert. No. Column”When a certification number is available, the value can be a hyperlink that opens the relevant certification organization’s verification/check page.
Gear Check Column
Section titled “Gear Check Column”Clicking this cell opens participant details directly in the gear check context.
Meet, Time, and Location Columns
Section titled “Meet, Time, and Location Columns”Clicking these fields opens booking meeting details where you can update meeting type, meeting time, and address.
Comment Column
Section titled “Comment Column”Clicking this field opens participant comments for add/edit/delete (depending on user rights).
Create, Copy, Reorder, and Delete Tabs
Section titled “Create, Copy, Reorder, and Delete Tabs”Use the controls in the top bar to:
- Add a new tab (copy-style setup from your current view)
- Customize the active tab name and visible columns
- Order tabs by drag-and-drop
- Delete an unneeded tab
Sort and Reorder Columns
Section titled “Sort and Reorder Columns”Inside the active tab settings, you can:
- Choose which columns are visible
- Reorder column display order
- Configure sorting priority (multi-level sorting)
For the full list of available fields, see Full Column List for Customize View.
Actions You Can Perform Directly
Section titled “Actions You Can Perform Directly”From Day Manifest, you can take action immediately without opening multiple pages.
1. Perform a Gear Check
Section titled “1. Perform a Gear Check”Open the participant side panel from the list to assign gear and complete the gear check flow.
- Click a participant name (or the Gear Check cell) to open the side panel.
- Open Gear & Sizes.
- Review customer-filled sizes and own-gear details.
- Select/deselect rental items by category.
- Review assignment warnings for potential same-day overlaps.
- Mark Gear Check Completed when ready.
- Save.
Detailed walkthrough: Rental Items
2. Add Operational Comments
Section titled “2. Add Operational Comments”Staff can leave comments directly from the Day Manifest workflow to share day-specific instructions and updates with colleagues.
Steps:
- Click the Comment cell for the participant.
- Add a new comment, or edit/delete an existing one (subject to user rights).
- Save to update the day view immediately.
This is useful for notes such as:
- arrival timing changes
- special handling instructions
- last-minute operational reminders
3. Change Meeting and Pickup Details
Section titled “3. Change Meeting and Pickup Details”You can update logistics directly in Day Manifest, including:
- meeting time
- pickup location
- address details
Steps:
- Click the Meet, Time, or Location cell.
- Update meeting type, meeting time, and meeting address.
- Save.
This is especially useful when running pickup-heavy operations and handling last-minute changes.
Pickup Address Dropdown and Auto-Fill Behavior
Section titled “Pickup Address Dropdown and Auto-Fill Behavior”When meeting type is set to pickup, the address field can provide selectable addresses collected from participant registration data (for example stay/address details).
If the booking pickup address was left empty when creating the booking, Diversdesk can auto-fill it from registration data:
- it takes the address from the first registered participant in that booking
- for group bookings, this means the first person who registers determines the initial pickup address
You can still update this address manually afterward from Day Manifest.
4. Update Booking Notes
Section titled “4. Update Booking Notes”For operations that require internal communication on a booking:
- Click the Int. Note cell.
- Add or update the internal booking note.
- Save.
5. Add Tanks and Blends
Section titled “5. Add Tanks and Blends”Tank and blend selection can be managed per participant through the participant details panel in Day Manifest.
- Open participant details.
- Open Trips.
- In the relevant trip assignment, add/update tank lines (quantity, size, gas blend).
- Save.
Notes:
- defaults come from your Settings > Tank and Blends setup
- values can be adjusted per participant and trip when needed
- this is useful when a diver joins only part of a trip, for example 2 dives on a 3-dive boat trip
Detailed walkthrough: Tanks and Blends
6. Assign/Unassign Participant to Trip Slots
Section titled “6. Assign/Unassign Participant to Trip Slots”From participant details, in the Trips section, you can toggle assignment for available trips and manage trip-related tank setup in the same flow.
Useful Operational Workflows
Section titled “Useful Operational Workflows”Export Day Data
Section titled “Export Day Data”Use Export to download a CSV of the active tab.
The export includes the currently configured columns and respects your view setup.
Build Pickup Routes Faster
Section titled “Build Pickup Routes Faster”For pickup operations, use the pickup-tag workflow to open route planning in Google Maps based on booking pickup data.
When pickup addresses are present, the page provides a direct pickups hyperlink to open route planning.
Common usage patterns:
- Centralized pickup route: build one route for all pickup addresses in the active day view.
- Per-trip pickup route: use the pickup link in a trip-specific context when you want route planning per trip.
Stay Synced With Planner Changes
Section titled “Stay Synced With Planner Changes”Planner updates are reflected in Day Manifest automatically, so your team works from current data during the day.
Permission-Aware Actions
Section titled “Permission-Aware Actions”Some actions depend on user rights:
- read rights: view day data
- Staff+: mostly read-only, with exceptions for comments and pickup/meeting time+address updates
- manager/write rights: full editing, including view customization and other editable actions
If you cannot edit a section, verify your staff permissions.
Full Column List for Customize View
Section titled “Full Column List for Customize View”The data you can add to a custom view/tab is not limited to default columns. In practice, the available fields cover:
- participant registration form data
- booking and payment metadata
- logistics and pickup details
- trip and staffing details
- rental and gear-related data
Through Customize View, you can choose which columns to include and in what order.
Current available column labels:
| Column Label | Clear Description |
|---|---|
| Name | Participant full name |
| Cert. Org. | Diving certification organization |
| Level | Diving certification level |
| Cert. No. | Diving certification number |
| Dives | Total number of dives this participant has completed (experience) |
| Yrs Exp. | Years of diving experience |
| Last Dive | Last dive recency |
| Instructor | Assigned instructor/guide |
| Age | Participant age |
| Height | Participant height |
| Weight | Participant weight |
| Wetsuit | Wetsuit size |
| BCD | BCD size |
| Boots | Boot/shoe size |
| Dive Wts. | Dive weight amount |
| Own Gear | Gear the participant brings and therefore does not need to rent (selected during registration) |
| Gear Check | Gear assignment/check completion status |
| Hide | Hidden divider option in Customize View |
| Nickname | Participant nickname |
| Flight # (Arr) | Arrival flight number |
| Flight D/T (Arr) | Arrival flight date/time |
| Flight # (Dep) | Departure flight number |
| Flight D/T (Dep) | Departure flight date/time |
| Booking Ref. | Booking reference |
| Inv # | Invoice number |
| Cntry | Participant country |
| H/R Address | Hotel/residence address |
| Stay | Accommodation name/address entered during signup (Google-autocomplete assisted) |
| Bed | Bed configuration |
| Booking Source | Booking source/channel |
| Birth Date | Date of birth |
| Gender | Gender field |
| Registration | Registration completion status |
| Waivers | Waiver completion/signature status |
| Activity | Activity title/details |
| Comment | Operational day comment |
| Payment Status | Booking payment status |
| Contact Number | Participant phone/contact number |
| Captain | Assigned captain |
| Crew | Assigned crew |
| Meet | Meeting type |
| Time | Meeting/pickup time |
| Location | Meeting/pickup address |
| Diet | Dietary preference |
| Allergies | Food allergies |
| Cust. Remark | Participant/customer remark |
| Int. Note | Internal booking note |
| PPT No. | Passport number |
| Room | Room field |
| Insurance | Insurance details |
| Emerg. Contact | Emergency contact name |
| Emerg. Phone | Emergency contact phone |
| Emerg. Relation | Emergency contact relationship |
| Referral Src. | Referral source |
| Contact Permission | Permission to contact |
| Instagram handle | |
| Direct booking | Flag for direct booking |
| Trip Time | Scheduled trip time |
| Trip Type | Trip type |
| Trip Title | Trip title/location |
| Boat Name | Assigned boat name |
| Add-ons | Add-ons linked to participant/activity |
| UW Camera | Underwater camera preference/status |
| Nitrox Certified | Nitrox certification status |